Capture Sharpening
What is it
The Capture Sharpening tool helps recover details lost due to in-camera blurring, which can be caused by diffraction, the anti-aliasing filter, or other sources of Gaussian-type blur.
It is applied to the raw file immediately after demosaicing and modifies the data in linear gamma to limit halo generation. This means that it will only work on raw files .
Is it the definitive sharpening tool?
Even though you can get excellent results with the default settings, it is not meant to be the only tool used for sharpening. Rather, it should be considered as a necessary first step to improve the distinction between noise and details prior to the image being processed by other tools further down the line. It can therefore be used in conjunction with other sharpening methods such as the Unsharp Mask or RL Deconvolution. The combination of sharpening tools will depend on what you are trying to achieve and what is acceptable by way of artifacts.
It will also depend on the final size of the image and whether it is going to be printed or not. This is because in both situations you may be able to apply stronger sharpening knowing that in the final image it will not be so apparent.
Here are two typical sharpening tool combinations:
- with the Unsharp Mask: use a small radius and watch out for artifacts as you increase the amount of sharpening.
- with RL Deconvolution: find an appropriate radius value (through trial and error to avoid halos) and choose a high contrast threshold so that you only enhance the largest details and edges. This will allow you to keep artifacts (common with this tool) to a minimum. You will probably need to apply a higher amount of sharpening as well.
How it works (settings)
Any changes in the settings are applied to the whole image, no matter what the zoom level, so depending on your system, it may take some time to process the changes. However, once any changes have been made, you can zoom and pan without any further processing delay.
You can also use the Sharpening Contrast Mask to see which details will be sharpened. Sharpening will occur in the white areas but not in the black areas. The mask is visible both in the Preview area and in the Navigator panel.
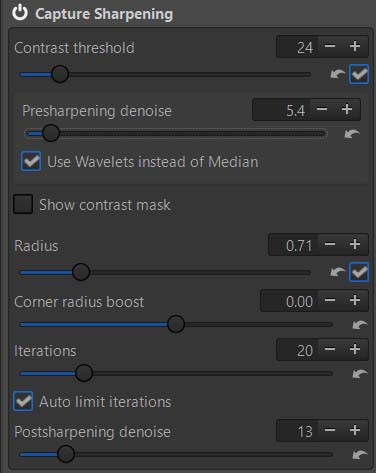
Contrast Threshold
By default the tool analyzes the image and calculates a threshold to prevent sharpening noise.
You can leave the automatic Contrast Threshold calculation on, or you can turn it off and set it as required: moving the slider to the right means that details will have to have higher contrast before they are sharpened. Higher Contrast Threshold values also reduce the amount of sharpening applied to noise, which tends to have lower detail contrast.
Radius
When in-camera blurring occurs, the effective resolution is no longer dependent on pixel size and instead, has a radius that increases in proportion to the amount of blurring.
The purpose of this tool is to reduce this blurring by trying to automatically guess the radius needed to counteract the effect.


You can also choose to adjust the radius yourself bearing in mind that if the value is too low, there will not be enough sharpening and if it is too high, it will lead to strong haloing on the edges. Don’t forget that you are only trying to undo the in-camera blurring.


Even though the default radius is spot on most of the time, there may be scenarios where you need to be extra careful to avoid noise and over sharpening. For example when an image is going to be processed in programs designed for focus stacking, astronomical images, super-resolution images etc. In these cases, it may be better to turn off the auto radius calculation and manually set the radius to a lower value to avoid artifacts (check the result by zooming in on the image). There will not be as much sharpening but there will be fewer or no artifacts that could be enhanced by subsequent processing in other software.
Note also that if you are editing a long-exposure raw file (with hot pixels), the auto radius calculation works much better with the hot pixel filter turned on (located in the Raw tab):
![]()
![]()
Corner Radius Boost
Often images are softer or more blurred in the corners than in the center. The Corner radius boost slider allows you to compensate for this by increasing or decreasing the radius in these areas.
Moving it to the right increases the sharpening in the outer areas and sliding it to the left will reduce the sharpening.
Iterations
Once the radii have either been automatically calculated or set manually, the tool carries out a series of calculations to try and compensate for any blurring. It is an iterative process, which will produce artifacts if carried too far. Checking the ‘Auto limit iterations’ checkbox will limit the number of iterations or you can do it manually using the Iterations slider.
Prerequisites
To get the best out of this tool, the camera white level needs to be correct, especially if the image has sharp transitions between clipped and non-clipped highlights. If you experience problems, please refer to the section on White Levels in Adding Support for New Raw Formats.
Capture sharpening and noise-related problems
Capture Sharpening is a remarkable tool entirely designed by Ingo Weirich around 2018. I won’t reiterate its exceptional features, from the user’s perspective, which are described in Rawpedia. Noise is a problem closely linked to the concept of sharpness.
A few technical considerations are important to understand before I explain the problems to be solved and the solutions implemented.
For Capture Sharpening, in its raw version:
- The code is located immediately after ‘demoicaising’, which allows the user to choose the ‘demoicaising’ method (AMaZE, DCB, etc.) and take into account most of the raw settings applied upstream.
- This position in the process places it before white balance and before the assignment of a working profile. Consequently, any modifications made to the raw algorithm must take this into account.
- This position also has the advantage of being immune to the ‘Preview’ effect. The result will always be the same on screen or in the TIFF/JPG output, regardless of the zoom level, because the processing is done on the entire image.
- However, any processing added at this level will also be applied to the entire image, resulting in significant resource consumption (memory, processing time).
Problems to solve
- When raw images are either too noisy or the noise is poorly distributed between flat areas and structures, the ‘Contrast Threshold (CT)’ function fails to work, resulting in: a) a CT value of zero; b) a uniformly white contrast mask. Manually adjusting the CT value does not always provide a solution.
- For images where the main subject (monument, bird, portrait, etc.) stands out against a neutral background, noise is much more visible in the background and less noticeable on the main subject. Why not take advantage of this stage, where Preview issues are nonexistent and a contrast mask is available to reduce noise (partially or completely) in the neutral background?
- The original version of Capture Sharpening can only process raw files. It is desirable to extend the capabilities of Capture Sharpening to non-raw files (TIFF, JPG, etc.).
The part added to Capture Sharpening (raw) is not intended to replace other processing methods, but rather to: a) allow ‘Capture Sharpening’ to work on certain noisy images; b) take advantage of the contrast mask and the Preview’s insensitivity to zoom to remove some of the most visible noise located in the background (flat areas) of the image.
The Problem with Contrast Masks
Until this version of RawTherapee, to display contrast masks in both ‘Capture Sharpening’ and ‘RL Deconvolution’, it was necessary to click on ‘Preview the sharpening contrast mask’ (shortcut:p) in the toolbar above the main preview.
Because there are now two additional contrast masks in ‘Selective Editing (SE)’:
- Capture Deconvolution.
- Denoise Settings.
It has become nearly impossible to know which mask is active. Hence the presence of a ‘Show contrast mask’ checkbox for each of the (SE) and ‘Capture Sharpening’ tools, furthermore, there can be multiple RT-spots. Activation via shortcut:p is maintained solely for compatibility purposes, but does not activate the (SE) masks.
Capture Sharpening: Presharpening denoise and Postsharpening denoise

Presharpening denoise:
In order for Capture Sharpening to work on noisy or very noisy images, applies either:
- A light ‘3x3 soft’ to a fairly strong ‘5x5 strong’ median denoising filter in successive gradual iterations prior to ‘Capture Sharpening’.
- Wavelet denoising which has a different, more progressive action, mainly on the first 4 levels of decomposition (high and medium frequency), more precisely, up to 64x64 pixel packets, and Edge performance (Wavelet Settings) is set to ‘D6 – standard plus’.
This helps clarify the contrast mask and allows ‘Contrast Threshold’ to work, and thus Capture Sharpening to work properly.
- This also helps to reduce noise in the output image.
- Be careful not to use values that are too high so as not to degrade the image. The value that allows the mask to appear (or a little more) is usually sufficient.
Associated Tooltip
In order for Capture Sharpening to work on noisy or very noisy images, applies either:
- A light ‘3x3 soft’ to a fairly strong ‘5x5 strong’ median denoising filter in successive gradual iterations prior to Capture Sharpening.
- Wavelet denoising which has a different, more progressive action, mainly on the first 4 levels of decomposition (high and medium frequency).
- This helps clarify the contrast mask and allows Contrast Threshold to work, and thus Capture Sharpening to work properly.
- This also helps to reduce noise in the output image. Be careful not to use values that are too high so as not to degrade the image. The value that allows the mask to appear (or a little more) is usually sufficient.
Postsharpening denoise
For raw images, allows you initial denoising after Capture Sharpening taking into account the mask information.
- Its main use is to separate the action between structured areas where the noise is barely visible and the often plain background (flat areas) where the noise is very visible.
- The algorithm uses Wavelet on all 3 RGB channels, up to pixel packets of 64x64. To improve quality and reduce potential artifacts Edge performance (Wavelet Settings) is set to ‘D20 – high plus’.
- Be careful not to use values that are too high, you can fine-tune the noise reduction later.
Associated Tooltip
For raw images, allows you initial denoising after Capture Sharpening taking into account the mask information.
- Its main use is to separate the action between structured areas where the noise is barely visible and the often plain background (flat areas) where the noise is very visible.
- Be careful not to use values that are too high, you can fine-tune the noise reduction later.
How to process TIF/JPG files
In Selective Editing, you will find the following options:
- Ability to apply Capture Sharpening to non-raw files
- Compensating for the loss of sharpness due to noise reduction
- Use a different algorithm, at the local level, to modify the sharpening Selective Editing - Capture Deconvolution