Editor
Introduction
The Image Editor tab is where you tweak your photos. By default RawTherapee is in “Single Editor Tab Mode, Vertical Tabs” (SETM/VT) which is more memory-efficient and lets you use the Filmstrip (described below). You can switch to “Multiple Editor Tabs Mode” (METM) by going to “Preferences > General > Layout”, however each Editor tab will require a specific amount of RAM relative to the image size and the tools you use, and also the Filmstrip is hidden in this mode, so we recommend you first give SETM a try.
The Preview Panel
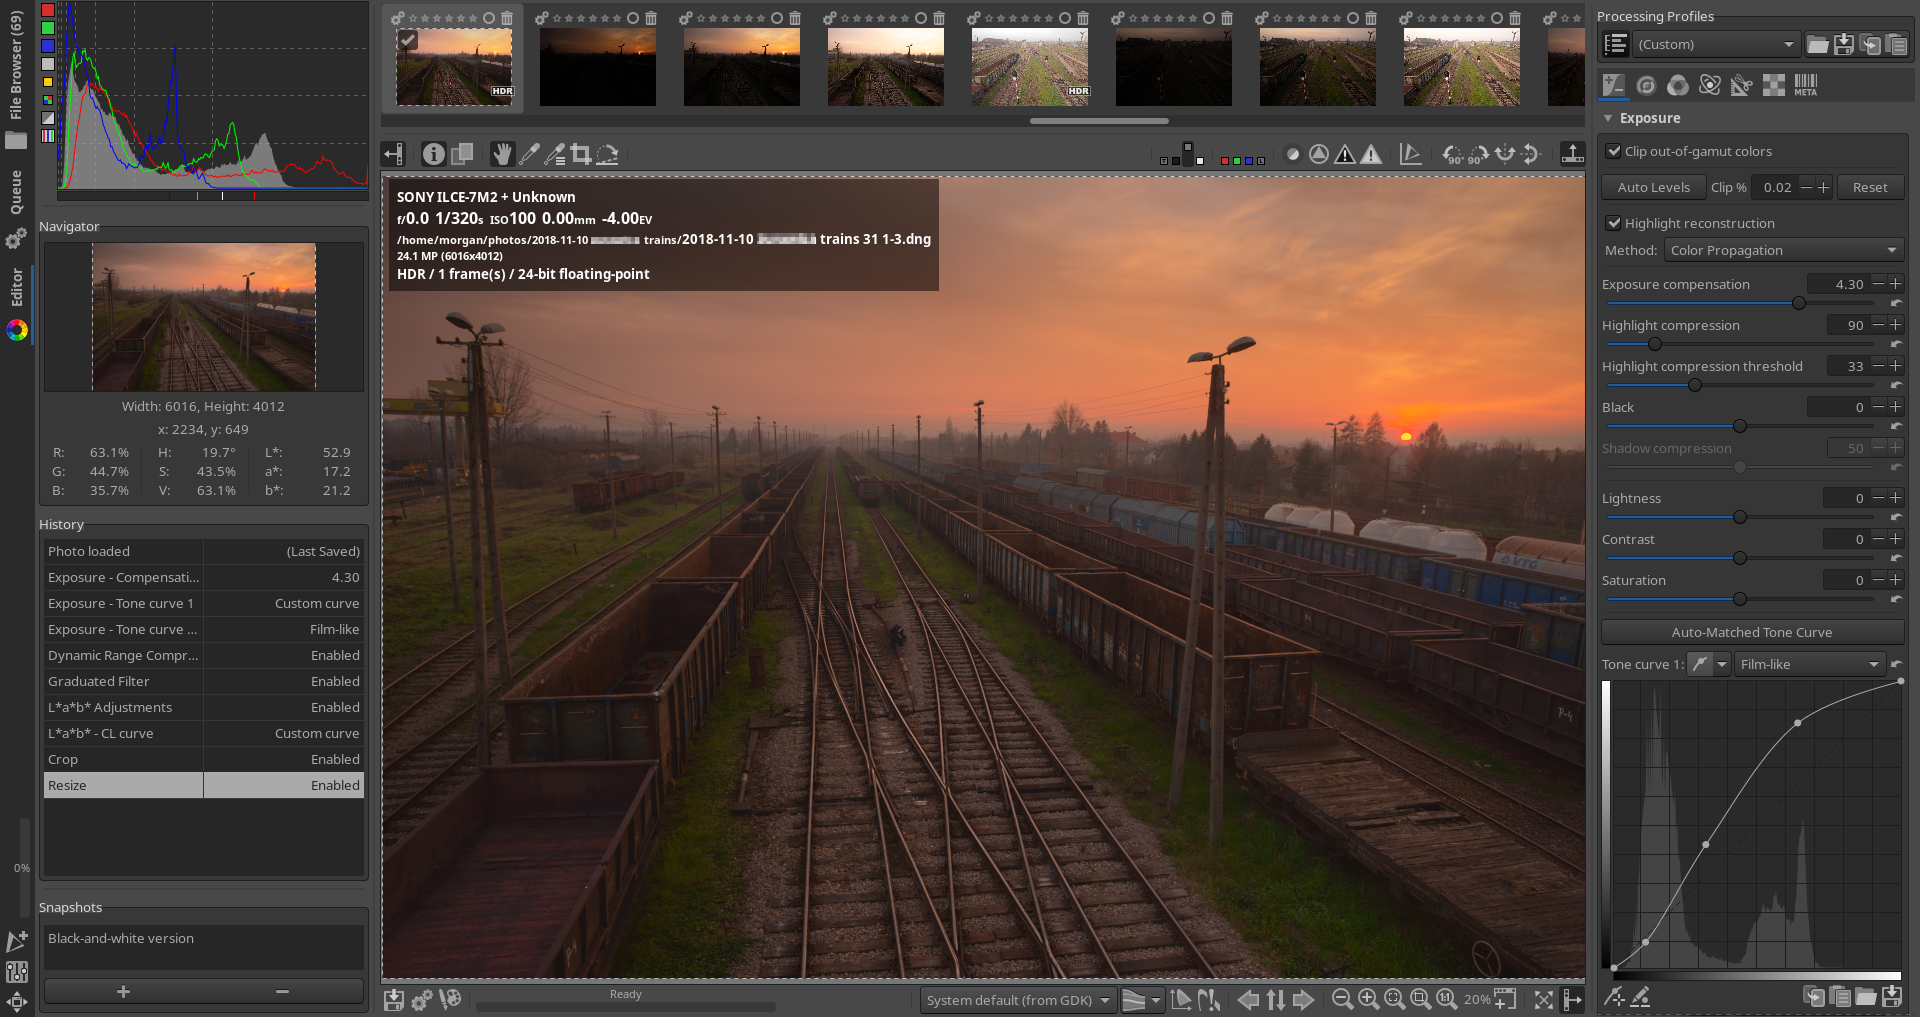
The central panel shows a preview of the image being edited. This
preview is generated from raw data if such is available. It reflects the
adjustments made by the tools in the
Toolbox. Note that the effects of some
tools are only accurately visible when you are zoomed in to 1:1 (100%)
or more; these tools are marked in the interface with a “1:1” icon
 alongside the tool’s name.
When opening an image, RawTherapee loads the tool settings from the sidecar file if one exists, else it applies a default sidecar file as specified in “Preferences > Image Processing > Default Processing Profile”. When you close the image (which happens automatically if you open a different image or if you close RawTherapee) the current tool settings are automatically saved to a sidecar file as specified in “Preferences > Image Processing > Processing Profile Handling”.
Eek! My Raw Photo Looks Different than the Camera JPEG
When opening a raw photo you may notice that it looks different from your camera’s JPEG, or from what other software show when viewing the same raw photo. In some cases this difference is minute, but in other cases it could be significant - the image could be darker, lack contrast, be less sharp and more noisy. What gives?
There are three things you must know first to understand what is happening here:
- Your camera does not show you the real raw data when you shoot raw photos. It processes the raw image in many ways before presenting you with the histogram and the preview on your camera’s display. Even if you set all the processing features which your camera’s firmware allows you to tweak to their neutral, “0” positions, what you see is still not an unprocessed image. Exactly what gets applied depends on the choices made by your camera’s engineers and company management, but usually this includes a custom tone curve, saturation boost, sharpening and noise reduction. Some cameras, particularly low-end ones and Micro Four-Thirds Lch color space. It is useful to estimate the saturation of colors as we perceive it with our eyes, that is, how “intense” or “washed-out” we perceive the colors. The closer to the edges the white points are, the more saturated the colors are.
The saturation can be understood as the amount of color there is in a hue, relative to the maximum for that hue (the “purest” hue), that is, the percentage of the pure color that the observed color has. The “average” person usually understands the “colors” as the hue with 100% saturation. In the color spaces used in the vectorscopes, these “colors” are found along the edges of their color ranges (similar to the CIExy diagram). The difference between HSL and Lch is that the latter represents the colors in a way that is closer to how we see them.
In the H-S Vectorscope the saturated colors at 100% (or almost) are located near the edges of the circle as white spots, indicating colors that are completely saturated or are already clipped. The concentric circles in the graph indicate a saturation of 25%, 50%, 75%, or 100% (in the outermost circle). This vectorscope is a good way to see how many pixels are outside (or almost outside) the color space of the output profile.
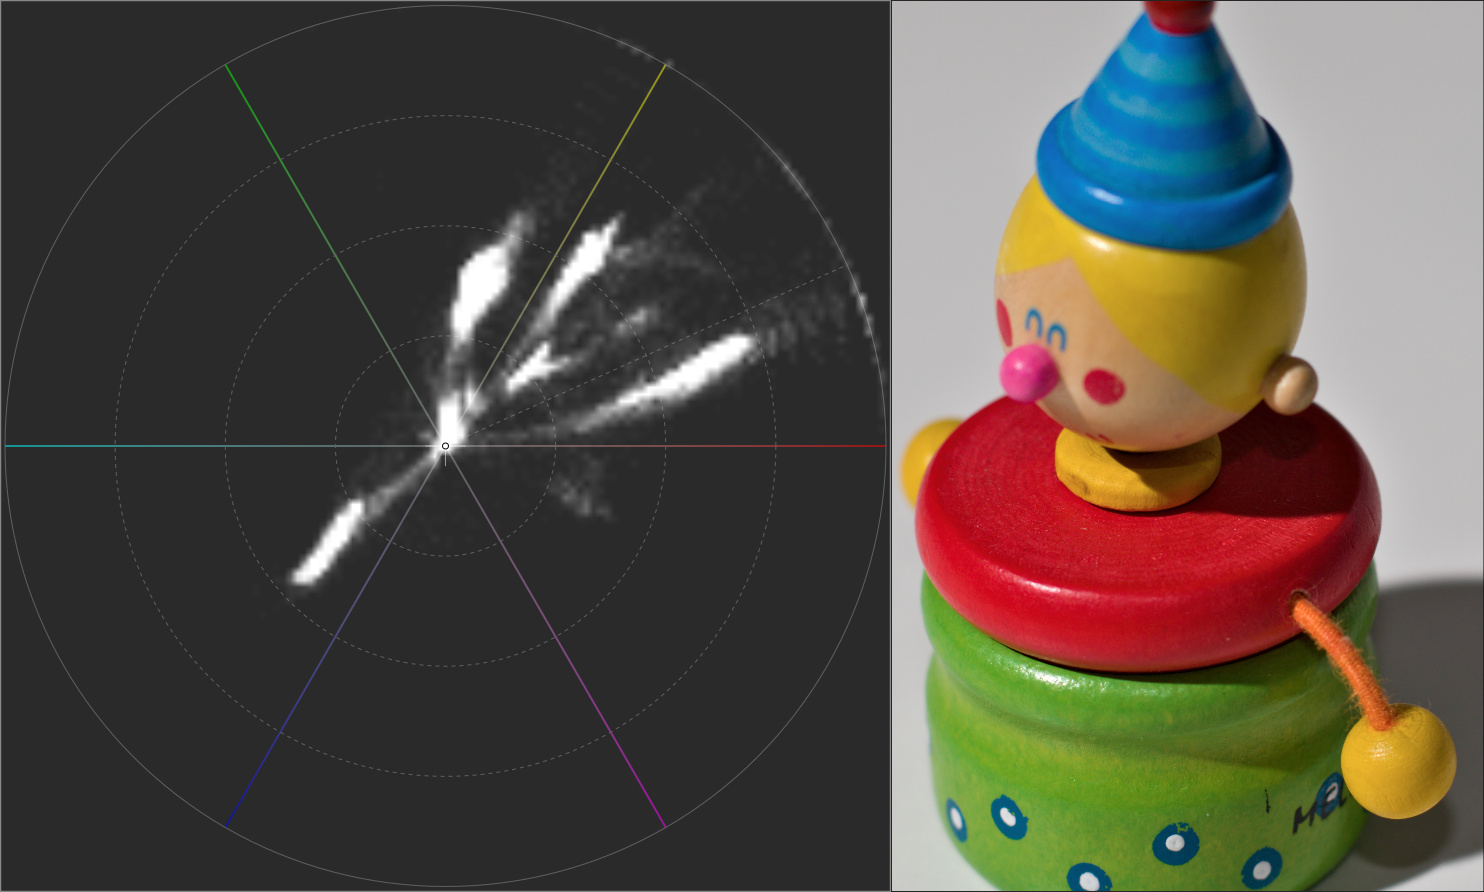
In this vectorscope you will see that there are three axes that point to the colors red, yellow, green, cyan, blue, and magenta.
In the image analysis, the saturated pixels are shown near the larger circle, between the colors yellow and red (top right).
The rest of the pixels are distributed and with different “amounts of color” (saturation), represented as white areas of a more or less intense color, depending on the number of pixels in that area.
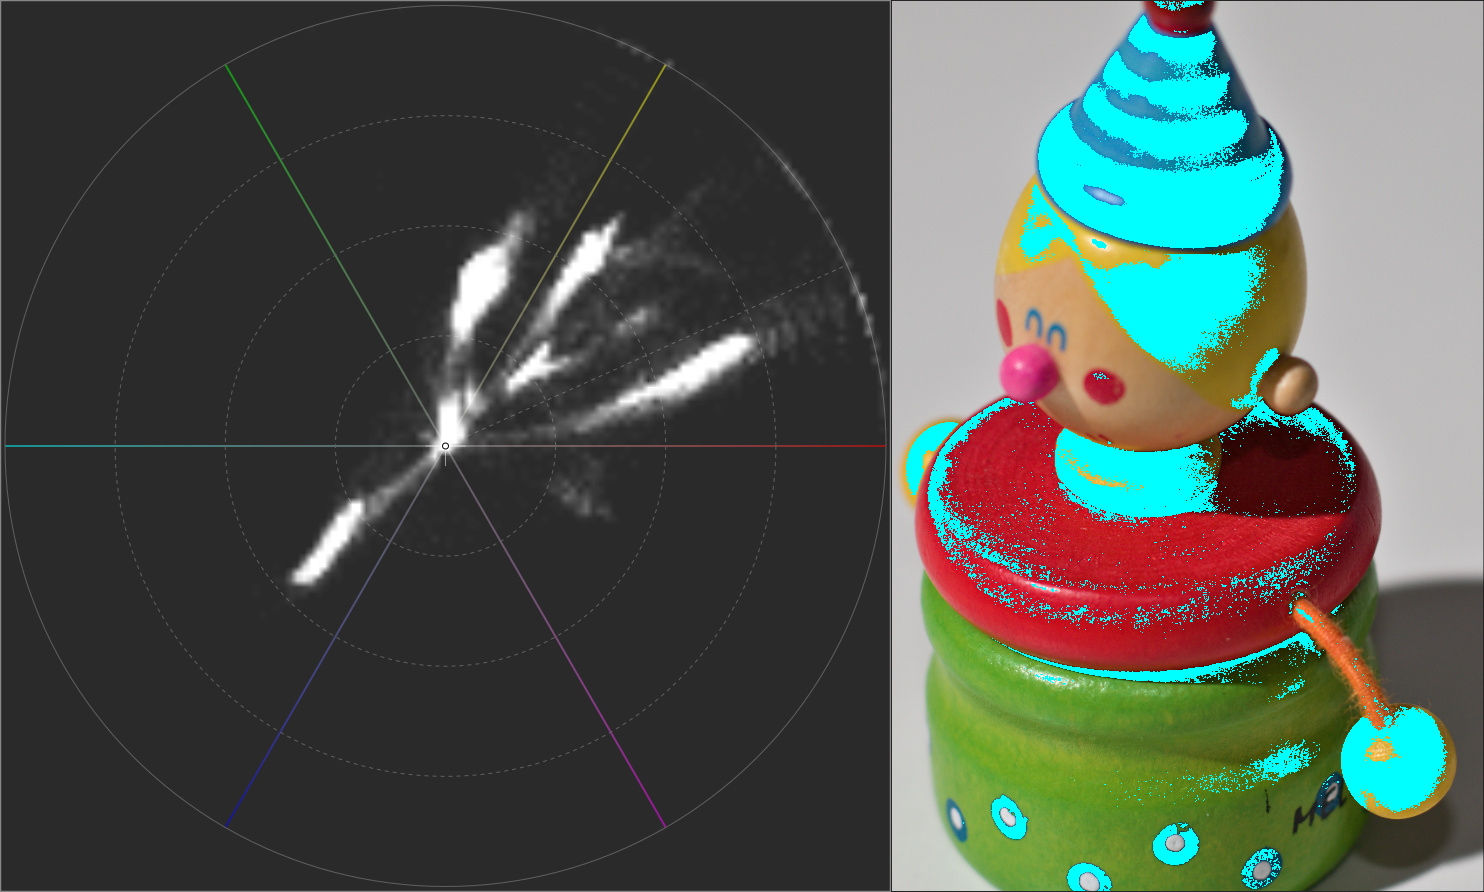
By activating the “show out-of-gamut colors” button you will see a cyan mask that highlights the out-of-gamut pixels.
In the H-C Vectorscope the concentric circles represent the chroma values 32, 64, 96, and 128. The further towards the edges a color is located, the more saturated it is.
The chroma values are calculated with the values a* and b* from the L*a*b* coordinates that you can see in the Navigator panel using the formula:

In this example you see the more saturated colors reaching approximately the value 85. Specifically, they are the red and yellow tones.

However, keep in mind that the three-dimensional color space is not regular (they are not spheres or cubes) and therefore to correctly estimate the clipped colors you should combine more than one analysis method.
Additionally, you can see a diagonal line at the top right. This line indicates the average Caucasian skin hue. In a portrait, hovering the mouse pointer over a medium skin tone, the graph should mark the pixel around this line. Otherwise, there is a color cast on the skin that you would be interested in removing.
Navigator
The Navigator panel shows a thumbnail of the currently opened image, and RGB, HSV and Lab values of the pixel your cursor is currently hovering over.
The values shown in the main histogram and Navigator panel are either
those of the working profile or of the gamma-corrected output profile,
depending on the state of the gamut button
 located
in the toolbar above the main preview. When the gamut button is enabled
the working profile is used, otherwise the gamma-corrected output
profile is used.
located
in the toolbar above the main preview. When the gamut button is enabled
the working profile is used, otherwise the gamma-corrected output
profile is used.
By clicking on the values in the Navigator you can cycle between these three formats:
- [0-255]
- [0-1]
- [%]
RawTherapee 5.1 onward can show the real raw photosite values. To see them, set the Navigator to use the [0-255] range, apply the Neutral processing profile, then set the Demosaicing method to “None”. The Navigator will show the real raw photosite values after black level subtraction within the range of the original raw data.
History
The History panel contains a stack of entries which reflect each of your image editing actions. By clicking on the entries you can step back and forth through the different stages of your work.
An entry is added each time you adjust a different widget - multiple edits to the same widget are stored as one entry. For example, adjusting the exposure compensation slider from “0” to “0.3” and then to “0.6” will result in one entry being stored with a final value of “0.6”. Likewise, when adjusting a curve, all individual control point adjustments are grouped into one history entry. Should you wish to store the adjustments as two (or more) history entries, you will have to split them by adjusting some other widget. For example, assuming a curve is in “Film-like” mode and you want to keep to that way: adjust several control points on the curve, then toggle the curve mode from “Film-like” to “Standard” and then back to “Film-like” to create a new history entry, and then continue adjusting the curve.
The history stack is not saved - it is lost as soon as you close the Editor tab. None of your adjustments are lost though, as the final state of all tools is saved in the sidecar file, ready to be used the next time you open that image.
Snapshots
Under the History panel is a panel called Snapshots. Its use is in that you can save a snapshot of the photo with all the adjustments up to that point in time, and then proceed to further modify your photo to give it a different appearance, saving new snapshots at every moment you feel you might have reached a version of your photo worth saving. Once you have two or more snapshots, you can just click on them to flip through the different versions and stick with whichever one you like best. In the future, the snapshots will be saved to the PP3 sidecar file. For now, the history and snapshots are lost when you load a new photo in the Image Editor or close RawTherapee.
The Right Panel
To the right is a panel which optionally shows the main histogram and
Processing Profiles selector ("Preferences > General > Layout >
Histogram in left panel"), and always shows the
Toolbox. You can hide this panel using the  hide icon,
or its keyboard shortcut.
hide icon,
or its keyboard shortcut.
Processing Profile Selector
The Processing Profiles panel allows you to apply, save, load, copy and paste processing profiles, partially or in full.
Read the Sidecar Files / Processing Profiles page for more information.
Toolbox
The Toolbox, in the right panel, contains all the tools you use to tweak your photos. Each tool has its own RawPedia article.
Editor Tab Modes
RawTherapee allows you to work on photos in two modes:
- Single Editor Tab Mode (SETM), where you work only on one photo at a
time, and each photo is opened in the same Editor tab. There is a
horizontal panel called the
Filmstrip at the
top of the Editor
tab showing the rest of the photos in that folder for easy access.
There are Previous Image and Next Image

 buttons in
the bottom toolbar (and keyboard shortcuts for them) to switch to the
previous/next image.
buttons in
the bottom toolbar (and keyboard shortcuts for them) to switch to the
previous/next image. - Multiple Editor Tabs Mode (METM), where each photo is opened in its own Editor tab. The Filmstrip is hidden in this mode and there are no previous/next buttons. Having multiple photos opened at the same time requires more RAM.
Try both modes and see which one suits you best. To do that, click on
the Preferences icon  in the bottom-left or top-right
corner of the RT window, choose “General > Layout” and set Editor
Layout to your preferred choice.
in the bottom-left or top-right
corner of the RT window, choose “General > Layout” and set Editor
Layout to your preferred choice.
Use this Preferences window to select a different language for the user interface, to choose a different color theme, change the font size, etc.
It is also possible to start RawTherapee in no-File-Browser-mode
(without the File Browser tab) by specifying RawTherapee to open an
image from your operating system’s file browser (in other words,
right-click on a photo and select “Open With > RawTherapee”), or by
using the image filename as an argument when starting RawTherapee from
the command line (rawtherapee /path/to/some/photo.raw). This mode was
introduced for people with little RAM as not having a File Browser tab
means RawTherapee uses a little less memory, however in practice the
amount of memory saved is little and the usability cost outweighs the
little benefit, so it is likely to be removed in the future (see issue 2254).
The Filmstrip


If you use Single Editor Tab Mode ("Preferences > General >
Layout") you can display a horizontal panel above the preview, this is
called the Filmstrip. It contains thumbnails of all images in the
currently opened album, and is synchronized with the currently opened
image so that you can use keyboard shortcuts or the previous and next
image
buttons to open the previous/next image without needing to go back to
the File Browser tab.
As of RawTherapee version 4.2.10, you can hide the Filmstrip’s toolbar to save screen space. There are two ways of doing this: one way just toggles the toolbar on/off without resizing the filmstrip to the new height, and the other way does the same but also automatically resizes the filmstrip’s height. Both are invoked via keyboard shortcuts only. As resizing the filmstrip’s height will trigger a refresh of the image preview and this might take a while if using CPU-hungry tools like noise reduction while zoomed in at 100%, the mode that doesn’t resize has been implemented for users with slow machines. Users with fast machines will find the auto-resizing mode more helpful.
Monitor Profile and Soft-Proofing
The widgets under the main preview in RawTherapee 5 allow you to apply a monitor color profile to the preview image. This enables users who have calibrated and profiled their monitors to get an instant and accurate preview of their work, whether you’re staying in sRGB or working in a wide gamut. Note: OS X users are limited to sRGB and will not get an accurate preview otherwise (see discussion), while users of Linux and Windows will get a correct wide-gamut preview.
Go to Preferences > Color Management and point the “Directory containing color profiles” to the folder into which you saved your monitor and printer ICC profile. Restart RawTherapee for the changes to take effect. Now you will be able to select your monitor’s color profile in the combo-box under the preview. Use the “Relative Colorimetric” rendering intent unless you have a good reason otherwise.
One can also enable soft-proofing of the preview. This will show you what your image will look like once it gets transformed by the printer profile set in Preferences > Color Management. If you want to adjust an image for printing and you have an ICC profile for your printer-paper combination you could set that as your output profile, enable “Black point compensation” in Preferences so that the blackest black in your image will match the blackest black your printer-paper combination is capable of reproducing, then enable soft-proofing. You will see what your image will look like if you print it. This allows you to make adjustments and get an instant preview of the result, saving you time and ink on test prints.
The icon with exclamation mark next to the soft-proofing button will gray out areas that cannot be reproduced by your printer, i.e. areas where you will loose details.
You should have a calibrated and profiled monitor in order for the soft-proofing preview to be accurate.
The items you see in the monitor profile combo-box (under the main preview) and in the printer profile combobox (in Preferences > Color Management) are ICC files located in a folder which you can point RawTherapee to by going to “Preferences > Color Management > Directory containing color profiles”.